Stackdriver を介した BigQuery、GCS、Pub/Sub へのログのエクスポート
Stackdriver を介して Istio アクセスログを BigQuery、GCS、Pub/Sub などの異なるシンクにエクスポートする方法。
この投稿では、Istio ログを Stackdriver に送信し、それらのログを BigQuery、Google Cloud Storage、Cloud Pub/Sub などのさまざまな設定済みシンクにエクスポートする方法を説明します。この投稿の最後には、BigQuery、GCS、Cloud Pub/Sub など、お好みの場所から Istio データの分析を実行できます。
Bookinfo サンプルアプリケーションは、このタスク全体を通してサンプルアプリケーションとして使用されます。
始める前に
クラスタに Istio をインストール し、アプリケーションをデプロイします。
ログをエクスポートするための Istio の設定
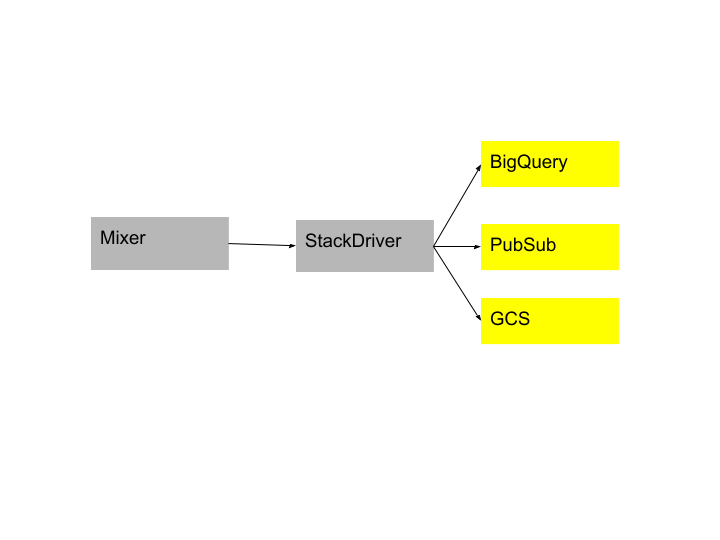
Istio は、logentry テンプレート を使用してログをエクスポートします。これは、分析に使用できるすべての変数を指定します。ソースサービス、宛先サービス、認証メトリクス(近日公開予定)などの情報が含まれています。以下はパイプラインの図です
Istio は、Stackdriver へのログのエクスポートをサポートしており、Stackdriver は、BigQuery、Pub/Sub、GCS などのお好みのシンクにログをエクスポートするように設定できます。最初にログをエクスポートするためのお好みのシンクを設定し、次に Istio で Stackdriver を設定するには、以下の手順に従ってください。
さまざまなログシンクの設定
すべてのシンクに共通の設定
- プロジェクトで Stackdriver Monitoring API を有効にします。
- シンクを設定する
principalEmailに、プロジェクトへの書き込みアクセス権と Logging Admin ロールの権限があることを確認してください。 GOOGLE_APPLICATION_CREDENTIALS環境変数が設定されていることを確認してください。設定方法については、こちら の手順に従ってください。
BigQuery
- ログエクスポートの宛先として BigQuery データセットを作成 します。
- データセットの ID を記録します。Stackdriver ハンドラーを設定するために必要になります。
bigquery.googleapis.com/projects/[PROJECT_ID]/datasets/[DATASET_ID]の形式になります - シンクのライター ID:
cloud-logs@system.gserviceaccount.comに、IAM で BigQuery データエディターの役割を付与します。 - Google Kubernetes Engine を使用している場合は、クラスタで
bigqueryスコープ が有効になっていることを確認してください。
Google Cloud Storage (GCS)
- ログを GCS にエクスポートする GCS バケットを作成 します。
- バケットの ID を記録します。Stackdriver を設定するために必要になります。
storage.googleapis.com/[BUCKET_ID]の形式になります - シンクのライター ID:
cloud-logs@system.gserviceaccount.comに、IAM でストレージオブジェクト作成者の役割を付与します。
Google Cloud Pub/Sub
- ログを Google Cloud Pub/Sub にエクスポートする トピックを作成 します。
- トピックの ID を記録します。Stackdriver を設定するために必要になります。
pubsub.googleapis.com/projects/[PROJECT_ID]/topics/[TOPIC_ID]の形式になります - シンクのライター ID:
cloud-logs@system.gserviceaccount.comに、IAM で Pub/Sub パブリッシャーの役割を付与します。 - Google Kubernetes Engine を使用している場合は、クラスタで
pubsubスコープ が有効になっていることを確認してください。
Stackdriver の設定
データを Stackdriver にエクスポートするには、Stackdriver ハンドラーを作成する必要があります。Stackdriver ハンドラーの設定については、こちら を参照してください。
次の yaml ファイルを
stackdriver.yamlとして保存します。<project_id>, <sink_id>, <sink_destination>, <log_filter>を具体的な値に置き換えます。apiVersion: "config.istio.io/v1alpha2" kind: stackdriver metadata: name: handler namespace: istio-system spec: # We'll use the default value from the adapter, once per minute, so we don't need to supply a value. # pushInterval: 1m # Must be supplied for the Stackdriver adapter to work project_id: "<project_id>" # One of the following must be set; the preferred method is `appCredentials`, which corresponds to # Google Application Default Credentials. # If none is provided we default to app credentials. # appCredentials: # apiKey: # serviceAccountPath: # Describes how to map Istio logs into Stackdriver. logInfo: accesslog.logentry.istio-system: payloadTemplate: '{{or (.sourceIp) "-"}} - {{or (.sourceUser) "-"}} [{{or (.timestamp.Format "02/Jan/2006:15:04:05 -0700") "-"}}] "{{or (.method) "-"}} {{or (.url) "-"}} {{or (.protocol) "-"}}" {{or (.responseCode) "-"}} {{or (.responseSize) "-"}}' httpMapping: url: url status: responseCode requestSize: requestSize responseSize: responseSize latency: latency localIp: sourceIp remoteIp: destinationIp method: method userAgent: userAgent referer: referer labelNames: - sourceIp - destinationIp - sourceService - sourceUser - sourceNamespace - destinationIp - destinationService - destinationNamespace - apiClaims - apiKey - protocol - method - url - responseCode - responseSize - requestSize - latency - connectionMtls - userAgent - responseTimestamp - receivedBytes - sentBytes - referer sinkInfo: id: '<sink_id>' destination: '<sink_destination>' filter: '<log_filter>' --- apiVersion: "config.istio.io/v1alpha2" kind: rule metadata: name: stackdriver namespace: istio-system spec: match: "true" # If omitted match is true. actions: - handler: handler.stackdriver instances: - accesslog.logentry ---設定をプッシュします
$ kubectl apply -f stackdriver.yaml
stackdriver "handler" created
rule "stackdriver" created
logentry "stackdriverglobalmr" created
metric "stackdriverrequestcount" created
metric "stackdriverrequestduration" created
metric "stackdriverrequestsize" created
metric "stackdriverresponsesize" created
サンプルアプリケーションにトラフィックを送信します。
Bookinfo サンプルの場合は、Web ブラウザで
http://$GATEWAY_URL/productpageにアクセスするか、次のコマンドを実行します$ curl http://$GATEWAY_URL/productpageログが Stackdriver を介して設定済みのシンクに流れていることを確認します。
- Stackdriver: プロジェクトの Stackdriver ログビューア に移動し、「GKE Container」->「Cluster Name」->「Namespace Id」で Istio アクセスログを探します。
- BigQuery: プロジェクトの BigQuery インターフェース に移動すると、シンクデータセットにプレフィックス
accesslog_logentry_istioのテーブルが表示されます。 - GCS: プロジェクトの ストレージブラウザ に移動すると、シンクバケットに
accesslog.logentry.istio-systemという名前のバケットが表示されます。 - Pub/Sub: プロジェクトの Pub/Sub トピックリスト に移動すると、シンクトピックに
accesslogのトピックが表示されます。
何が起こったのかを理解する
上記の Stackdriver.yaml ファイルは、Istio がアクセスログを Stackdriver に送信するように設定し、これらのログをエクスポートできるシンク設定を追加しました。詳細は以下のとおりです
種類
stackdriverのハンドラーを追加しましたapiVersion: "config.istio.io/v1alpha2" kind: stackdriver metadata: name: handler namespace: <your defined namespace>spec に
logInfoを追加しましたspec: logInfo: accesslog.logentry.istio-system: labelNames: - sourceIp - destinationIp ... ... sinkInfo: id: '<sink_id>' destination: '<sink_destination>' filter: '<log_filter>'上記の設定では、sinkInfo には、ログのエクスポート先のシンクに関する情報が含まれています。さまざまなシンクでこれがどのように入力されるかについての詳細は、こちら を参照してください。
Stackdriver のルールを追加しました
apiVersion: "config.istio.io/v1alpha2"
kind: rule
metadata:
  name: stackdriver
  namespace: istio-system spec:
  match: "true" # If omitted match is true
actions:
- handler: handler.stackdriver
  instances:
  - accesslog.logentry
クリーンアップ
新しい Stackdriver 設定を削除します
$ kubectl delete -f stackdriver.yaml後続のタスクを実行する予定がない場合は、Bookinfo クリーンアップ の手順を参照してアプリケーションをシャットダウンしてください。
エクスポートシンクでのログの可用性
BigQuery へのエクスポートは数分以内(ほぼ瞬時)で、GCS は 2 ~ 12 時間の遅延が発生する可能性があり、Pub/Sub はほぼ瞬時です。


